Hitchhiker's Guide to Chef
Introduction
If you have read my previous posts on Salt (part1 and part2) you will now be reading about a very different approach on configuration management. If you did not read it, you should =) at least the first part, where I write about DevOps and Configuration Management tools in general, converging into Salt.
One of the key differences, from the conceptual point of view, is that Chef has a third element, the Workstation, from where the administrator performs administrative actions, according to predetermined Access Control Lists (ACLs).
Another key difference is the way the Minions (hereby called Nodes) are put into a certain state, which is determined by the Chef client, not by the Chef server, this is somehow useful as the Node applies itself its Run List even if it has lost contact to the Chef server. Salt is also capable of this via a schedule function, but this post is not that of comparison between tools, so I'll leave that for another time and get on to Chef's architecture and workflow for different actions.
Architecture
Chef is complex in terms of its architecture, where it resembles an umbrella organization. I will try to summarize each function, pass on to best practices in terms of interactions between them, and then go through some of its limitations by design.

Chef architecture overview
In Figure 1 we can see three of the most basic interactions, and we can even consider them by the following (oversimplified) order:
- From a Chef Workstation, an admin bootstraps a machine
- The machine registers itself with the Chef Server, and is now a Chef Node
- The Chef Node synchronizes, with the Chef Server, any cookbook that applies to its run list, compiles its resource collection and ultimately converges the node (applies a computed set of recipes in a deterministic order)
And now, the Node is in a certain predetermined state, and will make an effort to stay that way, by periodically synchronizing its run list with the Chef Server and converging itself.
All of this is pretty simple stuff, so let us complicate it a bit by going through each of the components' functions.
Chef Workstation
The Chef Workstation can be configured by:
- Installing ChefDK
- Registering with the Chef Server:
- a user has to be created and a private_key generated, on the server side
- file ~/.chef/knife.rb should be present in the workstation and properly configured
Knife
knife is a command-line tool that provides an interface between a local chef-repo and the Chef server. knife helps users to manage [1]:
- Nodes
- Cookbooks and recipes
- Roles, Environments, and Data Bags
- Resources within various cloud environments
- The installation of the chef-client onto nodes
- Searching of indexed data on the Chef server
Chef.io makes available an all-in-one knife quick reference commands, you can either get the source files or get a ready to print PDF.
Cookbooks
In Chef, a cookbook is the fundamental unit of configuration and policy distribution. A cookbook defines a scenario and contains everything that is required to support that scenario [2]:
- Recipes that specify the resources to use and the order in which they are to be applied
- Attribute values
- File distributions
- Templates
- Extensions to Chef, such as custom resources and libraries
The reference language used to create cookbooks and defining recipes is Ruby. There is probably as much love for it as there is hate, in this post I will refrain about giving my personal opinion about it.
In this section the Cookbook should be seen as the development of the scenario itself and all properties that are a part of it.
Recipes
Taking word for word from Chef's documentation a recipe is the most fundamental configuration element within the organization [3].
- It is mostly a collection of resources
- Defines everything that is required to configure part of a system
- Must be stored in a cookbook
- May be included in another recipe
- May include other recipes
- Must be part of a run list in order to be executed
- The recipe's code is interpreted sequentially, by the order in which it is declared
- Resource execution may be delayed or expedited by notifying or be notified by another resource, thus creating an execution sequence different from the order the resources are declared
Attribute Values
Although attributes are used by the chef-client to understand certain node states, within a cookbook we can look at them has the state we want the node to be when we execute a specific recipe.
In a cookbook, attributes can be defined:
- In attribute files, any <filename>.rb placed in the attributes directory just under our cookbook's main directory
- In the middle of the recipe as we need them
With 1. we define attributes that are static and should not depend on data bag items values or any value that should only be known at runtime. This is because the node attributes are used in the creation of the node object and when this object is rebuilt the node attributes are updated based on attribute precedence, so it should not depend on values that come from other executions, i.e: fetch a value from a data bag or the value of the current dynamically assigned ip of a network interface created by the recipe.
The chef-client uses six types of attributes to determine the value that is applied to a node during a chef-client run [4]:
| Attribute Type | Description |
|---|---|
| default | A default attribute is automatically reset at the start of every chef-client run and has the lowest attribute precedence. Use default attributes as often as possible in cookbooks. |
| force_default | Use the force_default attribute to ensure that an attribute defined in a cookbook (by an attribute file or by a recipe) takes precedence over a default attribute set by a role or an environment. |
| normal | A normal attribute is a setting that persists in the node object. A normal attribute has a higher attribute precedence than a default attribute. |
| override | An override attribute is automatically reset at the start of every chef-client run and has a higher attribute precedence than default, force_default, and normal attributes. An override attribute is most often specified in a recipe, but can be specified in an attribute file, for a role, and/or for an environment. A cookbook should be authored so that it uses override attributes only when required. |
| force_override | Use the force_override attribute to ensure that an attribute defined in a cookbook (by an attribute file or by a recipe) takes precedence over an override attribute set by a role or an environment. |
| automatic | An automatic attribute contains data that is identified by Ohai at the beginning of every chef-client run. An automatic attribute cannot be modified and always has the highest attribute precedence. |
Besides attribute values behind provided from attribute files and recipes, they are also collected by Ohai at the start of each chef-client run, i.e: node['hostname'] which returns the hostname for the node, simple enough.
When defining attributes in a attribute file, we can ommit the node module, as such:
default['myapp']['dir'] = '/srv/myapp'in recipes, however, we can not:
node.default['myapp']['dir'] = '/srv/myapp'The precedence of the attributes is well documented
File Distributions
In a cookbook, files are managed using the following resources [5]:
- cookbook_file resource manages files on the node, based on source files that are located in the files directory in a cookbook, using the source property (for more information on cookbook_file properties see the documentation):
cookbook_file '/etc/sshd_config' do
  source 'sshd_config'
  owner 'root'
  group 'root'
  mode '0640'
  action :create
end- file resource manages file content directly on the node (for more information on file properties see the documentation):
file '/etc/resolv.conf' do
  content 'nameserver 1.1.1.1
nameserver 1.0.0.1'
  mode '0644'
  owner 'root'
  group 'root'
end- remote_file resource transfers a file from a remote location to the node (for more information on remote_file properties see the documentation):
remote_file '/tmp/wordpress-latest.tar.gz' do
  source 'https://wordpress.org/latest.tar.gz'
  owner 'root'
  group 'root'
  mode '0755'
  action :create
end- template resource manages files that are added to nodes based on files that are located in the templates directory in a cookbook (for more information on template properties see the documentation):
template '/etc/resolv.conf' do
  source 'resolv.conf.erb'
  owner 'root'
  group 'root'
  mode '0644'
  variables(nameservers: node['nameservers']) # optional
end
Templates
As you can see from the template resource in the File Distributions section, we can pass attributes as variables to our source file, so we can have files on the node generated dynamically according to properties relating to the node itself, cool =)
So taking that example, we could have a template called resolv.conf.erb with the following content:
| |
and in the default.rb attributes file we could have:
default['nameservers'] = ['1.1.1.1', '1.0.0.1', '8.8.8.8', '8.8.4.4']when we execute the template resource defined above, in the node at the end of the run we would have the file /etc/resolv.conf with the following content:
| |
Extensions to Chef
In this post I will not go in-depth on this subject, just know that these exist:
| Libraries | allow for arbitrary Ruby code to be included in a cookbook. The most common use for libraries is to write helpers that are used throughout recipes and custom resources. A library file is a Ruby file that is located within a cookbook’s /libraries directory. Because a library is built using Ruby, anything that can be done with Ruby can be done in a library file, including advanced functionality such as extending built-in Chef classes.(for more information see the documentation) |
| Custom Resources: | are an extension of Chef that adds your own resources; are implemented and shipped as part of a cookbook;are reusable in the same way as resources that are built into Chef (for more information see the documentation) |
| Resources: | are statements of configuration policies that: describe the desired state for a configuration item; declare the steps needed to bring that item to the desired state; specify a resource type -- such as package, template, or service; lists additional details (also known as resource properties), as necessary; are grouped into recipes, which describe working configurations (for more information see the documentation) |
Metadata.rb
Last but definitely not least, the metadata.rb file is one of the fundamental files of a cookbook, every cookbook requires one and is created automatically when running knife cookbook create command on the Chef Workstation, but require a very small amount of metadata information. The file is located at the top of every cookbook directory structure, and its contents provide information that helps both the Chef Server and Client to correctly deploy cookbooks to each node [6].
| Setting | Required | Description |
|---|---|---|
| name | Yes | The name of the cookbook. |
| version | No | The current version of a cookbook. Version numbers always follow a simple three-number version sequence, i.e:
version '2.0.0'. |
| chef_version | No | A range of chef-client versions that are supported by this cookbook. All
version constraint operators are
applicable to this field. i.e: chef_version '~> 14' |
| depends | No | This field requires that a cookbook with a matching name and version exists on the Chef server. When the match exists, the Chef server includes the dependency as part of the set of cookbooks that are sent to the node when the chef-client runs. It is very important that the depends field contain accurate data. If a dependency statement is inaccurate, the chef-client may not be able to complete the configuration of the system. All version constraint operators are applicable to this field. |
| description | No | A short description of a cookbook and its functionality. |
| long_description | No | A longer description that ideally contains full instructions on the proper use of a cookbook, including resources, libraries, dependencies, and so on. There are two ways to use this field: with the contents embedded in the field itself or with the contents pulled from a file at a specified path, such as a README.rdoc located at the top of a cookbook directory. |
| gem | No | Specifies a gem dependency for installation into the chef-client through bundler. The gem installation occurs after all cookbooks are synchronized but before loading any other cookbooks. Use this attribute one time for each gem dependency. |
| source_url | No | The URL for the location in which a cookbook’s source code is maintained. This setting is also used by Chef Supermarket. In Chef Supermarket, this value is used to define the destination for the “View Source” link. |
| issues_url | No | The URL for the location in which a cookbook’s issue tracking is maintained. This setting is also used by Chef Supermarket. In Chef Supermarket, this value is used to define the destination for the “View Issues” link. |
| license | No | The type of license under which a cookbook is distributed: Apache v2.0, GPL v2, GPL v3, MIT, or license 'Proprietary - All Rights Reserved (default). Please be aware of the licenses for files inside of a cookbook and be sure to follow any restrictions they describe. |
| maintainer | No | The name of the person responsible for maintaining a cookbook, either an individual or an organization. |
| maintainer_email | No | The email address for the person responsible for maintaining a cookbook. Only one email can be listed here, so if this needs to be forwarded to multiple people consider using an email address that is already setup for mail forwarding. |
| supports | No | Show that a cookbook has a supported platform. Use a version constraint to define dependencies for platform versions: < (less than), <= (less than or equal to), = (equal to), >= (greater than or equal to), ~> (approximately greater than), or > (greater than). To specify more than one platform, use more than one supports field, once for each platform. |
Although the only mandatory option is the cookbook's name, I recommend to have at least the following example for a starting cookbook:
| |
This metadata template is almost supermarket ready, missing just the cookbook's dependencies and Operating System (OS) support, so I think it's a great start.
Linting
Linters are very important in a development workflow, a linter verifies a program or program segments against standard libraries. It checks the code for common portability errors. It tests the programming against some tried and true guidelines. linting your code is a necessary (though not sufficient) step in writing clean, portable, effective programs. But lint is not perfect. It will not magically salvage bad code. It will not find all your bugs. [7] I certainly do not have anything to add to this sentence besides the tools we should use for our cookbooks:
- cookstyle
- foodcritic (deprecated since 25/09/2020)
Tests
According to Chef's documentation, we can use ChefSpec to simulate the convergence of resources on a node:
- Is an extension of RSpec, a behavior-driven development (BDD) framework for Ruby
- Is the fastest way to test resources and recipes
ChefSpec is a framework that tests resources and recipes as part of a simulated chef-client run. ChefSpec tests execute very quickly. When used as part of the cookbook authoring workflow, ChefSpec tests are often the first indicator of problems that may exist within a cookbook. [8]
It does not make sense to make tests to ensure that, i.e: a package was really installed or the contents of a template file are up to date as the recipes that apply those things already do them. It is however sane to write tests reflecting a set of operations that should be applied to the node according to the current stable state of the recipes, this assures that if some regression, i.e: a wrong file is changed or a package dependency is no longer available, the recipe(s) will fail some test and you will notice that something is wrong before converging a node.
Compliance
InSpec is a free and open-source framework for testing and auditing your applications and infrastructure. InSpec works by comparing the actual state of your system with the desired state that you express in easy-to-read and easy-to-write InSpec code. InSpec detects violations and displays findings in the form of a report, but puts you in control of remediation. [9]
It can be integrated with Chef, but that is out of the scope of this post. Maybe another day.
Kitchen
Kitchen is a tool that allows us to test infrastructure code on one or more platforms in isolation.
"A driver plugin architecture is used to run code on various cloud providers and virtualization technologies such as Vagrant, Amazon EC2, and Docker.
For Chef workflows, cookbook dependency resolution via Berkshelf or Policyfiles is supported or include a cookbooks/ directory and Kitchen will know what to do.
Kitchen is used by all Chef-managed community cookbooks and is the integration testing tool of choice for cookbooks."
We specify every requirement for kitchen in .kitchen.yml file usually located in the root directory of our coookbook, but really kitchen only cares about having that file present in whatever directory you are calling it.
An example file for a .kitchen.yml configuration file running on Openstack would be:
| |
In this configuration we have a 2 suites:
- defaults
- verytastyrun
We use the Openstack driver, and so we have to configure our environment:
| Property Name | Environment Variable | Description |
|---|---|---|
| openstack_auth_url | OS_AUTH_URL | URL for the Openstack stackcontroller |
| openstack_domain_name | OS_USER_DOMAIN_NAME | name of the Openstack domain we will be authentication with |
| openstack_region | OS_REGION_NAME | Openstack region where we want to launch our instances |
| openstack_project_name | OS_PROJECT_NAME | The project where we want to launch the instances (note: this is not enough for auth) |
| openstack_project_id | OS_PROJECT_ID | The project ID |
| openstack_username | OS_USERNAME | Openstack username to authenticate with |
| openstack_api_key | OS_API_KEY | API Key corresponding to the previous username |
We also configure the environment variable OS_KEYPAIR_NAME which should correspond to the name of the keypair created in Openstack with our OS_USERNAME account, and the private key should be located in .OS_KEYPAIR_NAME.pem in the root directory of our cookbook, as defined by the transport['ssh_key'] yaml key.
Next we specify which provisioner to use, in our case we are testing a chef cookbook so we chose chef_zero. Here we can specify configuration options to be passed to chef, in this example we define options for data bags.
We then define which platforms should be converged, which should be available in Openstack. We can define a prefix for the instance name with the server_name_prefix property.
Finally, in the suites section we define which convergence run lists should be made available to kitchen. In this example we have two:
- defaults
- verytastyrun
In the run_list property we should specify from which cookbook we want to get each recipe.
A usual command sequence to converge a suite and destroy the converged instances would be:
localhost:~$ kitchen converge <platform name>localhost:~$ kitchen destroy <platform name>
If, however, we would like to just create one of the machines, i.e: debian, login into it, do some manual testing and then converge the machine we would:
localhost:~$ kitchen create debianlocalhost:~$ kitchen login debiandebian-stretch-asdfgh:~$ logoutlocalhost:~$ kitchen converge debianlocalhost:~$ kitchen destroy debian
Chef Server
We have now arrived at the core component of our infrastructure, the Chef Server. In this section I will present, to some extend, the capabilities of the Chef Server and you to interact with it.
Interaction with Chef's API may be done via GET/POST HTTP methods, via the knife tool via plugins, built-in or custom made, or from within the Chef Server itself via the chef-server-ctl. In this section I will focus on operations with the chef-server-ctl tool, however you can assume that every command is similar in syntax with the knife tool.
You can interact with virtually any component of the Chef Server via its API, so I will not post here all of the operations, instead you can check them out in the documentation.
The first thoughts about any of the following components should be "What can I manage and how can I manage it?", so let us get on with the individual components of the Chef Server, what we can manage of each component and how do we do it.
Users
Like any architecture which has an authentication component, we have users. What can we do with it?
| Description | Command |
|---|---|
| Create a user | $ chef-server-ctl user-create USER_NAME FIRST_NAME [MIDDLE_NAME] LAST_NAME EMAIL 'PASSWORD' [-f USER_NAME.pem] |
| Delete a user | $ chef-server-ctl user-delete USER_NAME |
| Edit a user's details | $ chef-server-ctl user-edit USER_NAME |
| View a list of users | $ chef-server-ctl user-list [--with-uri] |
| Show a user's details | $ chef-server-ctl user-show USER_NAME [--with-orgs] |
Organizations
An organization is the top-level entity for role-based access control in the Chef server. Each organization contains the default groups (admins, clients, and users, plus billing_admins for the hosted Chef server), at least one user and at least one node (on which the chef-client is installed). The Chef server supports multiple organizations. The Chef server includes a single default organization that is defined during setup. Additional organizations can be created after the initial setup and configuration of the Chef server. [10]
| Description | Command |
|---|---|
| Create an organization | $ chef-server-ctl org-create ORG_NAME "ORG_FULL_NAME" [--association_user USER_NAME] [-f FILE_NAME] |
| Delete an organization | $ chef-server-ctl org-delete ORG_NAME |
| View a list of organizations | $ chef-server-ctl org-list [--all-orgs] [--with-uri] |
| Show an organization's details | $ chef-server-ctl org-show ORG_NAME |
| Add a user to an organization | $ chef-server-ctl org-user-add ORG_NAME USER_NAME --admin |
| Remove a user from an organization | $ chef-server-ctl org-user-remove ORG_NAME USER_NAME |
Groups
A group is used to define access to object types and objects in the Chef server and also to assign permissions that determine what types of tasks are available to members of that group who are authorized to perform them. Groups are configured per-organization. [10]
Individual users who are members of a group will inherit the permissions assigned to the group. The Chef server includes the following default groups: admins, clients, and users. For users of the hosted Chef server, an additional default group is provided: billing_admins. [10]
There is another group named server-admins, it is a global group that grants its members permission to create, read, update, and delete user accounts, with the exception of superuser accounts. The server-admins group is useful for users who are responsible for day-to-day administration of the Chef server, especially user management via the knife user subcommand. Before members can be added to the server-admins group, they must already have a user account on the Chef server. [10]
| Description | Command |
|---|---|
| Add a user to the server-admins group | $ chef-server-ctl grant-server-admin-permissions USERNAME |
| Remove a user from the server-admins group | $ chef-server-ctl remove-server-admin-permissions |
| List users that belong to the server-admins group | $ chef-server-ctl list-server-admins |
Group administration is done via chef-web, chef-automate or the hosted chef management interface.
Cookbooks
We have already covered what a Cookbook are. In this section the Cookbook should be seen not as the development of the scenario itself but as one or more versions of a already developed scenario which each version should be frozen. Meaning that if any changes should occur to a certain version of the cookbook, the cookbook is no longer on that version. Although not mandatory, this practice makes it harder to break something that depends on a cookbook's version.
To manage cookbooks present on the Chef Server we can perform the following operations, using the knife and chef commands:
| Description | Command |
|---|---|
| Create a new cookbook | $ chef generate cookbook COOKBOOK_PATH/COOKBOOK_NAME [<options>] |
| Delete one or more cookbooks | $ knife cookbook delete COOKBOOK_NAME [COOKBOOK_VERSION] [<options>] |
| Delete one or more cookbook, using a regular expression | $ knife cookbook bulk delete REGEX -p |
| Download a cookbook from the Chef Server to the current working directory | $ knife cookbook download COOKBOOK_NAME [COOKBOOK_VERSION] [<options>] |
| View a list of cookbooks currently available on the Chef Server | $ knife cookbook list [--all] [--with-uri] |
| Generate the metadata for one or more cookbooks. | $ knife cookbook metadata [<options>] |
| Load the metadata for a cookbook from a file. | $ knife cookbook metadata from file FILE |
| View information about a cookbook, parts of a cookbook, or a file associated with it | $ knife cookbook show COOKBOOK_NAME [COOKBOOK_VERSION] [PART...] [FILE_NAME] (options) |
| Test a cookbook for syntax errors | $ knife cookbook test COOKBOOK_NAME [<options>] |
| Upload one or more cookbooks from a local repository to the Chef server | $ knife cookbook upload [COOKBOOK_NAME...] [<options>] |
Nodes
To manage nodes that exist on a Chef Server we either use the knife command or the web management interface.
Run-lists
A run-list defines all of the information necessary for Chef to configure a node into the desired state. A run-list is [11]:
- An ordered list of roles and/or recipes that are run in the exact order defined in the run-list; if a recipe appears more than once in the run-list, the chef-client will not run it twice
- Always specific to the node on which it runs; nodes may have a run-list that is identical to the run-list used by other nodes
- Stored as part of the node object on the Chef server
- Maintained using knife and then uploaded from the workstation to the Chef server, or maintained using Chef Automate
Policies
Policy maps business and operational requirements, process, and workflow to settings and objects stored on the Chef server [12]:
- Roles define server types, such as “web server” or “database server”
- Environments define process, such as “dev”, “staging”, or “production”
- Certain types of data - passwords, user account data, and other sensitive items - can be placed in data bags, which are located in a secure sub-area on the Chef server that can only be accessed by nodes that authenticate to the Chef server with the correct SSL certificates
- The cookbooks (and cookbook versions) in which organization-specific configuration policies are maintained
Environments
An environment is a way to map an organization’s real-life workflow to what can be configured and managed when using Chef server. Every organization begins with a single environment called the _default environment, which cannot be modified (or deleted). Additional environments can be created to reflect each organization’s patterns and workflow. For example, creating production, staging, testing, and development environments. Generally, an environment is also associated with one (or more) cookbook versions. [13]
Roles
A role is a way to define certain patterns and processes that exist across nodes in an organization as belonging to a single job function. Each role consists of zero (or more) attributes and a run-list. Each node can have zero (or more) roles assigned to it. When a role is run against a node, the configuration details of that node are compared against the attributes of the role, and then the contents of that role’s run-list are applied to the node’s configuration details. When a chef-client runs, it merges its own attributes and run-lists with those contained within each assigned role. [14]
Attributes
Previously we saw what are attributes and how to define them in a cookbook. However, attributes can also be defined in:
- The state of the Node itself
- Roles
- Environments
We also saw which types of precedence exist, but taking this new information that Roles, Environments, and Node state play a part on this we can view the attribute precedence as a table, as shown in {F#fig-chef-preced}:
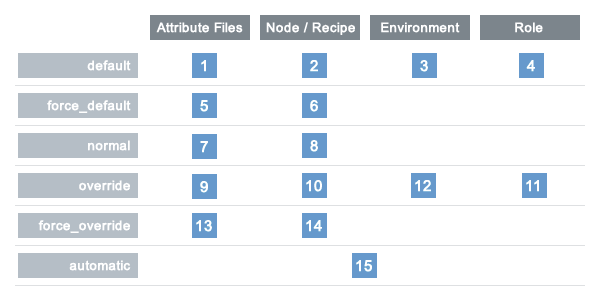
Chef attributes overview
For more information on attributes take a look at [4].
Data Bags
Data bags store global variables as JSON data. Data bags are indexed for searching and can be loaded by a cookbook or accessed during a search. [15]
We will usually use the knife tool to manage data bags, although creating data bags manually can be useful to test cookbooks with Kitchen.
| Description | Command |
|---|---|
| Create an empty data bag (or an item) | $ knife data bag create DATA_BAG_NAME (DATA_BAG_ITEM) |
| Create a data bag item a file | $ knife data bag from file BAG_NAME ITEM_NAME.json |
| Edit a data bag item | $ knife data bag edit admins charlie |
| List existing data bags | $ knife data bag list |
| List items from a data bag | $ knife data bag show DATA_BAG_NAME |
| Show contents of a data bag item | $ knife data bag show DATA_BAG_NAME ITEM_NAME |
| Search query for data bag items | $ knife search DATA_BAG_NAME QUERY_STRING |
| Delete a data bag (or an item) | $ knife data bag delete DATA_BAG_NAME (DATA_BAG_ITEM) |
In order to use manually created data bags in our recipes we can create a directory named data_bags that follows a simple directory/file structure, i.e:
data_bags/
├── db_passwords
│   ├── mysqlroot.json
│   └── slurm.json
├── secrets
│   └── munge.json
├── service_passwords
│   └── myservice.json
└── user_passwords
    ├── alice.json
    └── bob.json
This way every subdirectory within the data_bags directory corresponds to a data bag, and every .json file corresponds to an item to each of those data bags.
Each data bag item should also follow a specific structure: [15]
| |
Encrypted Data Bags
A data bag item may be encrypted using shared secret encryption. This allows each data bag item to store confidential information (such as a database password) or to be managed in a source control system (without plain-text data appearing in revision history). Each data bag item may be encrypted individually; if a data bag contains multiple encrypted data bag items, these data bag items are not required to share the same encryption keys. [15]
the knife command can encrypt and decrypt data bag items, using the create, edit, from file or show arguments and the options:
| Option | Description |
|---|---|
| --secret SECRET | The encryption key that is used for values contained within a data bag item. If SECRET is not specified, the chef-client looks for a secret at the path specified by the encrypted_data_bag_secret setting in the client.rb file |
| --secret-file FILE | the path to the file that contains the encryption key |
To create the secret key, one can use OpenSSL to generate a random number to be used as a secret key:
$ openssl rand -base64 512 | tr -d '\r\n' > encrypted_data_bag_secretChef Node
A node is any machine - physical, virtual, cloud, network device, etc. - that is under management by Chef.
The types of nodes that can be managed by Chef include, but are not limited to, the following: [16]
| Node Type | Description |
| Server | A physical node is any active device attached to a network that can run a chef-client and allows that chef-client communicates with a Chef server. |
| Cloud | A cloud-based node is hosted in an external cloud-based service, such as Amazon Web Services (AWS), OpenStack, Rackspace, Google Compute Engine, or Microsoft Azure. Plugins are available for knife that provide support for external cloud-based services. |
| Virtual Machine | A virtual node is a machine that runs only as a software implementation, but otherwise behaves much like a physical machine. |
| Network Device | A network node is any networking device that is being managed by a chef-client, such as networking devices by Juniper Networks, Arista, Cisco, and F5. |
| Container | Containers are an approach to virtualization that allows a single operating system to host many working configurations, where each working configuration - a container - is assigned a single responsibility that is isolated from all other responsibilities. |
The key components, which gather other components, of nodes are the Chef Client and Ohai.
Chef Client
A chef-client is an agent that runs locally on every node. When a chef-client is run, it will perform all the steps that are required to bring the node into an expected state, including: [16]
- Registering and authenticating the node with the Chef server
- Building the node object
- Synchronizing cookbooks
- Compiling the resource collection by loading each of the required cookbooks, including recipes, attributes, and all other dependencies
- Taking the appropriate and required actions to configure the node
- Looking for exceptions and notifications, handling each as required
Ohai
Ohai is a tool that is used to collect system configuration data and is run at the beginning of every Chef run to determine the system's state.
The types of attributes Ohai collects include but are not limited to:
- Operating System
- Network
- Memory
- Disk
- CPU
- Kernel
- Host names
- Fully qualified domain names
- Virtualization
- Cloud provider metadata
Attributes that are collected by Ohai are automatic level attributes, in that these attributes are used by the chef-client to ensure that these attributes remain unchanged after the chef-client is done configuring the node. [16]
Chef Supermarket
Chef Supermarket is the site for community cookbooks. It provides an easily searchable cookbook repository and a friendly web UI. Cookbooks that are part of the Chef Supermarket are accessible by any Chef user.
There are two ways to use Chef Supermarket:
- The public Chef Supermarket is hosted by Chef and is located at Chef Supermarket
- A private Chef Supermarket may be installed on-premise behind the firewall on the internal network. Cookbook retrieval from a private Chef Supermarket is often faster than from the public Chef Supermarket because of closer proximity and fewer cookbooks to resolve. A private Chef Supermarket can also help formalize internal cookbook release management processes (e.g. “a cookbook is not released until it’s published on the private Chef Supermarket”). [17]
Berkshelf
Berkshelf can include multiple Chef Supermarket instances for dependency resolution. Cookbook dependency resolution is performed from the top down. The first source defined in the Berksfile will be searched for the cookbook before the second source.
The Berksfile first looks for the cookbook on the private Chef Supermarket and, if not discovered there, then looks on the public Chef Supermarket. [17]
| |
Conclusion
In this post we have seen the architecture of the Chef configuration management tool, went through each component, and saw how each component can interact with on another. This was not intended as a first touch tutorial on Chef, but more as a summary and helpful reference for Chef's components and interactions.
Check Chef.io learn site for well-structured and paced tutorials.
References
| [1] | --, About Knife - Chef.io Documentation, 2018. [link] |
| [2] | --, About Cookbooks - Chef.io Documentation, 2018. [link] |
| [3] | --, About Recipes - Chef.io Documentation, 2018. [link] |
| [4] | (1, 2) --, About Attributes - Chef.io Documentation, 2018. [link] |
| [5] | --, About Files - Chef.io Documentation, 2018. [link] |
| [6] | --, Cookbook Directories and Metadata - Chef.io Documentation, 2018. [link] |
| [7] | Ian F. Darwin, Checking C programs with lint, O’Reilly & Associates, 1990, ISBN: 9780937175309,0937175307 |
| [8] | --, ChefSpec Documentation,`[link] <https://docs.chef.io/chefspec.html>`__ |
| [9] | --, InSpec Documentation, [link] |
| [10] | (1, 2, 3, 4) --, Organizations and Groups - Chef.io Documentation, 2018 [link] |
| [11] | --, About Run-lists - Chef.io Documentation, 2018 [link] |
| [12] | --, About Policy - Chef.io Documentation, 2018 [link] |
| [13] | --, About Environments - Chef.io Documentation, 2018 [link] |
| [14] | --, About Roles - Chef.io Documentation, 2018 [link] |
| [15] | (1, 2, 3) --, About Data Bags - Chef.io Documentation, 2018 [link] |
| [16] | (1, 2, 3) --, About Nodes - Chef.io Documentation, 2018 [link] |
| [17] | (1, 2) --, Chef Supermarket - Chef.io Documentation, 2018 [link] |
Tags: linux devops chef configuration management ruby
Related Content
- An Advanced Guide to Salt
- A Comprehensive Introduction to Salt
- Slurm in Ubuntu Clusters - Part 2
- Slurm in Ubuntu Clusters - Part 1
- Using Python Virtual Environments with Slurm