Slurm in Ubuntu Clusters - Part 2
Overview
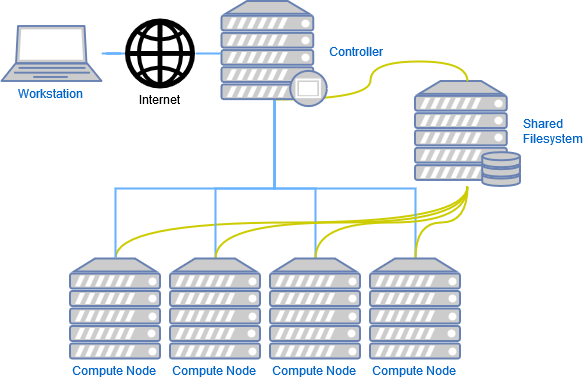
Overview of the slurm infrastructure
In this article we will not go through the installation and configuration of the shared filesystem described above. We assume that the HOME directory is shared between the controller and the compute nodes, in the future I'll write about how to achieve this using NFS (for simplicity) and BeeGFS, for now let us follow with Slurm usage.
Summary of commands
- scontrol - used to view and modify Slurm configuration and state.
- sacct - displays accounting data for all jobs and job steps in the Slurm job accounting log or Slurm database.
- sinfo - show information about the compute nodes status.
- squeue - show information about the scheduler's job queue.
- smap - show information about slurm jobs, partitions, and set configurations parameters.
- sview - graphical user interface to view and modify the slurm state.
- salloc - obtain a Slurm job allocation execute a command, and then release the allocation when the command is finished.
- srun - run parallel jobs.
- scancel - cancel a submitted job.
- sbatch - submit a batch script to Slurm.
Changing the state of a Node
With the scontrol command we can control, among other things, the state of each compute node. If, for example, we need to put an idle node down for maintenance we would do the following:
root@controller:~# scontrol update NodeName=compute-1 State=Down Reason='Maintenance'
root@controller:~# sinfo
PARTITION AVAIL  TIMELIMIT  NODES  STATE NODELIST
base*        up 3-00:00:00      1  down* compute-1
base*        up 3-00:00:00      3   idle compute-[2-4]
root@controller:~# scontrol update NodeName=compute-1 State=Idle
root@controller:~# sinfo
PARTITION AVAIL  TIMELIMIT  NODES  STATE NODELIST
base*        up 3-00:00:00      4   idle compute-[1-4]
root@controller:~#
If, on the other hand, the node we want to put down is executing jobs (its state is allocated or mix), we need to put it in the draining state. Which means that the node will no longer accept new jobs and when all the running jobs complete, the node's state will be drained, and we can then put it in the down state.
root@controller:~# scontrol update NodeName=compute-1 State=Drain Reason='Maintenance'
root@controller:~# sinfo
PARTITION AVAIL  TIMELIMIT  NODES  STATE NODELIST
base*        up 3-00:00:00      1   drng compute-1
base*        up 3-00:00:00      3   idle compute-[2-4]
root@controller:~# sinfo
PARTITION AVAIL  TIMELIMIT  NODES  STATE NODELIST
base*        up 3-00:00:00      1  drain compute-1
base*        up 3-00:00:00      3   idle compute-[2-4]
root@controller:~# scontrol update NodeName=compute-1 State=Idle
root@controller:~# sinfo
PARTITION AVAIL  TIMELIMIT  NODES  STATE NODELIST
base*        up 3-00:00:00      4   idle compute-[1-4]
root@controller:~#
Executing jobs interactively
To execute jobs interactively, there are usually two steps:
- Allocate resources
- Run parallel job
As an example, we want to run a BASH shell in a compute cluster. We will ask for just 100MB of RAM and 1 cpu.
username@controller:~$ salloc --cpus-per-task=1 --mem=100MB
salloc: Pending job allocation 27564
salloc: job 27564 queued and waiting for resources
salloc: job 27564 has been allocated resources
salloc: Granted job allocation 27564
username@controller:~$ srun --pty /bin/bash
username@node4:~$ hostname
node4
username@node4:~$ exit
username@node4:~$ exit
salloc: Relinquishing job allocation 27564
username@controller:~$
Batch file
If instead of an interactive job we want a job running on its own for a long amount of time, we can create a batch script and submit it to the slurm scheduler queue.
Ley us take the example code for a simple Hello World! program.
helloworld.c
| |
Let us compile it.
username@controller:~$ gcc -o helloworld helloworld.cAnd now we can create a batch file to submit the job.
simple_hello.batch
| |
Let us submit the job with the help of the sbatch command and see its output.
username@controller:~/helloworld$ sbatch simple_hello.batch
Submitted job 12345
username@controller:~/helloworld$ ls
simple_hello.batch   simple_hello-12345.out   simple_hello-12345.err
username@controller:~/helloworld$ cat simple_hello-12345.err
username@controller:~/helloworld$ cat simple_hello-12345.out
Hello World!
username@controller:~/helloworld$
It works!
Now let us try a more complex example, making a C program which will run on multiple nodes, via MPI, and outputs the name of the node it is running on and the rank attributed to it [MPITUTO].
helloworld_mpi.c
| |
Compile the code with MPI capabilities.
username@controller:~/helloworld$ mpicc -o helloworld_mpi helloworld_mpi.c
username@controller:~/helloworld$ ls
helloworld_mpi helloworld_mpi.c
username@controller:~/helloworld$
helloworld_mpi.batch
| |
Now we can submit the batch script as a job to queue.
username@controller:~/helloworld$ sbatch helloworld_mpi.sbatch
Submitted batch job 27560
username@controller:~/helloworld$  squeue
JOBID PARTITION     NAME     USER ST       TIME  NODES NODELIST(REASON)
27560      base hello-w_ username PD       0:00      2 (Resources)
username@controller:~/helloworld$  squeue
JOBID PARTITION     NAME     USER ST       TIME  NODES NODELIST(REASON)
27560      base hello-w_ username  R       0:05      2 node6,node7
On this sequence we can see that the job was submitted to the queue, and it was waiting for resources to be available and run the job. Then, the job started running and was allocated to node6 and node7.
As the job is finished, let us check the job's output:
username@controller:~/helloworld$ cat helloworld_mpi-27560.err
username@controller:~/helloworld$ cat helloworld_mpi-27560.out
Hello world from processor node7, rank 7 out of 8 processors
Hello world from processor node6, rank 5 out of 8 processors
Hello world from processor node6, rank 4 out of 8 processors
Hello world from processor node6, rank 0 out of 8 processors
Hello world from processor node6, rank 2 out of 8 processors
Hello world from processor node6, rank 3 out of 8 processors
Hello world from processor node6, rank 6 out of 8 processors
Hello world from processor node6, rank 1 out of 8 processors
username@controller:~/helloworld$
As we can see, the job was allocated to 7 of node6's CPUs and 1 of node7's CPUs.
As we can also notice, the order of execution of each process is not deterministic, it has to do with the time the process reaches the processor, and also which other processes may be running and yielding in that same processor.
MPI programming is not really in the scope of this article, however if you are interested you can check these tutorials.
Getting job and node information
In part 1 of Slurm in Ubuntu Clusters we saw how to see the general node state with the sinfo command.
username@controller:~$ sinfo
PARTITION AVAIL  TIMELIMIT  NODES  STATE NODELIST
base*        up 3-00:00:00      1   idle compute-[1-4]
long         up   infinite      1   idle compute-[1-4]
In the previous section we also saw how to monitor the job submission queue with the squeue command.
There are three more commands that are also very useful to analyse the state of the cluster, and also the job history for a certain user or a set of the users.
The smap command is similar to the squeue, in a way that it also shows the slurm scheduling queue. However it also shows information about Slurm jobs, partitions, and set configurations parameters.
username@controller:~$ smap -c
JOBID PARTITION     USER   NAME ST       TIME NODES NODELIST
27560      base username hellow  R   00:00:05     1 node6,node7
The sacct command displays accounting data for all jobs and job steps in the Slurm job accounting log or Slurm database. With it you can see information about past submitted jobs.
username@controller:~$ sacct
       JobID    JobName  Partition    Account  AllocCPUS      State ExitCode
------------ ---------- ---------- ---------- ---------- ---------- --------
27560.batch       batch                                7  COMPLETED      0:0
27560.0      hydra_pmi+                                2  COMPLETED      0:0
The sview command shows a graphical user interface to view and modify the Slurm state. Of course that you can only modify slurm objects to which you have access, i.e: you can cancel your submitted jobs but not one of another user.
To use this command you require X11 forwarding activated on your SSH session, if you are connecting from a windows machine you can use XMing, a X Window System Server for Windows.
If you are using Bitvise SSH Client, you can activate X11 forwarding on the client side by going to the Terminal tab and enable the X11 Forwarding option.
Conclusion
We have now seen how to set up a slurm cluster and how to manage its jobs and nodes.
There are a lot of details that I have skipped for simplicity, but the information present in this article should get you up and running on the way to master slurm clusters.
Tags: linux slurm python scheduler hpc cluster MPI
Related Content
- Slurm in Ubuntu Clusters - Part 1
- Using Python Virtual Environments with Slurm
- UEFI via software RAID with mdadm in Ubuntu 16.04
- Cookies Policy
- About