Slurm in Ubuntu Clusters - Part 1
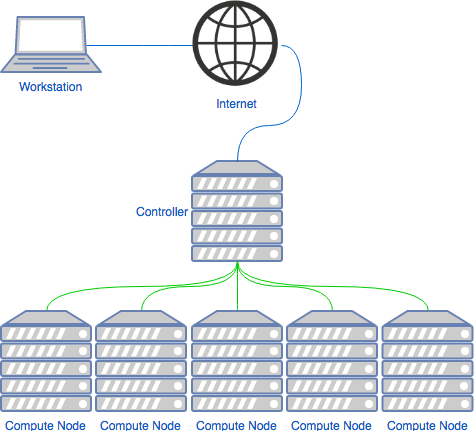
In the High Performance Computing (HPC) world it is usual to have a job scheduler. Its function is to receive job allocation requests, and job to the run on the system. In the image below we can see an example of an architecture that makes use of these systems.
In this post we will be looking into how to set up and configure [Slurm Workload Manager], formerly known as Simple Linux Utility for Resource Management [CCE2003]
Controller
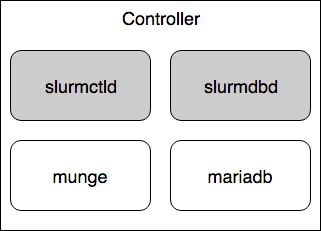
The controller machine is where one should submit its jobs. It runs the slurmctld service, which controls the compute nodes. And in our case it will also run the slurmdbd service, which controls the accounting and qos settings for the queues.
- O.S pkgs:
- mailutils
- slurm-llnl
- sview
- mariadb-client
- mariadb-server
- libmariadb-client-lgpl-dev
- python-dev
- python-mysqldb
- slurm-llnl-slurmdbd
root@controller# apt-get install -y mailutils slurm-llnl sview mariadb-client mariadb-server libmariadb-client-lgpl-dev python-dev python-mysqldb slurm-llnl-slurmdbdDatabase
After installing MariaDB we should confine the connections to the DB to localhost as we will be using this only for the slurmdbd installed in the local machine. In the file /etc/mysql/mariadb.conf.d/50-server.cnf we should have the following setting:
| |
If you will be accepting connections from other machines, i.e if you want to have the database running on a separate machine than the one having the slurmdbd, then you should change this setting accordingly.
If you have the need to receive connections from multiple distinct subnets, you have to set this to 0.0.0.0 and create firewall policies blocking all incoming traffic to port 3306 except for those subnets.
Now, let us create the necessary databases and grant the slurm user rights to manage them, as user root:
root@controller# mysql -u root
Welcome to the MariaDB monitor.  Commands end with ; or \g.
Your MariaDB connection id is 8
Server version: 10.0.36-MariaDB-0ubuntu0.16.04.1 Ubuntu 16.04

Copyright (c) 2000, 2018, Oracle, MariaDB Corporation Ab and others.

Type 'help;' or '\h' for help. Type '\c' to clear the current input statement.

MariaDB [(none)]> grant usage on *.* to 'slurm'@'%' identified by 'safepassword'
Query OK, 1 row affected (0.00 sec)

MariaDB [(none)]> create database slurm_acct_db
Query OK, 1 row affected (0.00 sec)

MariaDB [(none)]> create database slurm_job_db
Query OK, 1 row affected (0.00 sec)

MariaDB [(none)]> grant all privileges on slurm_acct_db.* to 'slurm'@'localhost';
Query OK, 1 row affected (0.00 sec)

MariaDB [(none)]> grant all privileges on slurm_acct_db.* to 'slurm'@'localhost';
Query OK, 1 row affected (0.00 sec)

MariaDB [(none)]> exit
Bye
root@controller#
Node Authentication
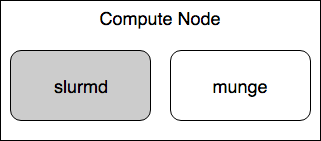
The subsystem responsible for authentication between the slurmd and slurmctl is munge. After installing the slurm-llnl package you should now have the munge package also installed.
First, let us configure the default options for the munge service:
/etc/default/munge:
| |
Next, we create a key, common to all comunicating nodes, in /etc/munge/munge.key.
You can create a secret key using a variety of methods [MUN2018]:
- Wait around for some random data (recommended for the paranoid):
root@controller# dd if=/dev/random bs=1 count=1024 >/etc/munge/munge.key- Grab some pseudorandom data (recommended for the impatient):
root@controller# dd if=/dev/urandom bs=1 count=1024 >/etc/munge/munge.key- Enter the hash of a password (not recommended):
root@controller# echo -n "foo" | sha512sum | cut -d' ' -f1 >/etc/munge/munge.key- Enter a password directly (really not recommended):
root@controller# echo "foo" >/etc/munge/munge.keyNow the service can be started:
root@controller# systemctl start mungeAs a side note, if you are not able to manage binary files due to some kind of data conversion, i.e: using a configuration manager that may give you a hard time copying raw binary data, you can convert the file contents to a base64 representation of the data.
root@controller# dd if=/dev/random bs=1 count=1024 | base64 > /etc/munge/munge.keyAccounting Storage
The subsystem responsible for the job completion storage, maintaining information about all of the submitted jobs to the slurm system.
This is optional to install to have a functioning slurm system, but in order to have a more solid understanding of what happened with each past job it is necessary to have some record of those job.
After we have the slurm-llnl-slurmdbd package installed we configure it, by editing the /etc/slurm-llnl/slurmdb.conf file:
| |
Now we can start the slurmdbd service:
root@controller# systemctl start slurmdbdCentral Controller
The central controller system is provided by the slurmctld service. This is the system that monitors the resources status, manages job queues and allocates resources to compute nodes.
The main configuration file is /etc/slurm-llnl/slurm.conf this file has to be present in the controller and all of the compute nodes and it also has to be consistent between all of them.
| |
In this config file we configured 4 compute nodes and 2 partitions.
In the node section we need to give a profile for each machine, which we can get with a combination of the output of /proc/cpuinfo and /proc/meminfo, and of course, knowledge about the underlying architecture.
The RealMemory parameter refers to the available memory you want to have available for resources, you do not need to match it with 100% of the available physical memory (and you should not, keep a few MBs reserved for the operating system).
Now we can start the slurmctld service:
root@controller# systemctl start slurmctldCompute Nodes
A compute node is a machine which will receive jobs to execute, sent from the Controller, it runs the slurmd service.
- O.S. pkgs:
- slurm-llnl
- slurm-wlm-basic-plugins
Authentication
As mentioned before in Node Authentication, we need to setup the default options for the munge service, create a key, and start the service. On the compute nodes we can just copy the key file from the controller:
root@controller# for i in `seq 1 4`; do scp /etc/munge/munge.key compute-${i}:/etc/munge/munge.key; doneand then start the service:
root@compute-1# systemctl start mungeCompute Node Daemon
The subsystem responsible for launching and managing slurmstepd is slurmd. Slurmstepd is launched for a batch job and each job step, launches user application tasks, manages accounting, application I/O, profiling, signals, etc. [BMISC17]
As mentioned before in Central Controller the file /etc/slurm-llnl/slurm.conf has to be identical to the one created in the controller. Similar to the munge key, you can copy the file from the controller to the compute nodes.
Control Groups provide a mechanism for aggregating/partitioning sets of tasks, and all their future children, into hierarchical groups with specialized behaviour. [KRNCGRP]
In the /etc/slurm-llnl/slurm.conf file you may have already noticed the following parameters:
TaskPlugin=task/cgroup
ProctrackType=proctrack/cgroup
The proctrack/cgroup plugin is an alternative to other proctrack plugins such as proctrack/linux for process tracking and suspend/resume capability. proctrack/cgroup uses the freezer subsystem which is more reliable for tracking and control than proctrack/linux. [SLUCGRP]
The task/cgroup plugin is an alternative to other task plugins such as the task/affinity plugin for task management, and provides the following features [SLUCGRP]
- The ability to confine jobs and steps to their allocated cpuset.
- The ability to bind tasks to sockets, cores and threads within their step's allocated cpuset on a node.
- Supports block and cyclic distribution of allocated cpus to tasks for binding.
- The ability to confine jobs and steps to specific memory resources.
- The ability to confine jobs to their allocated set of generic resources (gres devices).
The task/cgroup plugin uses the cpuset, memory and devices subsystems.
There are many specific options for the task/cgroup plugin in cgroup.conf. The general options also apply. See the cgroup.conf man page for details.
/etc/slurm-llnl/cgroup.conf
| |
- CgroupAutomount
- In our case we want the cgroup plugins to first try to mount the required subsystems, instead of failing if these subsystems are not mounted.
- ConstrainCores
- We also want the subsystem to constrain allowed cores to the subset of allocated resources. This functionality makes use of the cpuset subsystem.
Due to a bug fixed in version 1.11.5 of HWLOC, the task/affinity plugin may be required in addition to task/cgroup for this to function properly. The default value is "no". [SLUCGRP]
Now we can start the slurmd service and start accepting jobs.
root@compute-1# systemctl start slurmdCheckpoint
Let us check if everything is up and running and the slurm components are all communicating:
root@controller# sinfo
PARTITION AVAIL  TIMELIMIT  NODES  STATE NODELIST
base*        up 3-00:00:00      1   idle compute-[1-4]
long         up   infinite      1   idle compute-[1-4]
root@controller#
Next Steps
Now we can start accepting job submissions, in part 2 of Slurm in Ubuntu Clusters we will see how to submit job scripts, allocate resources and see the status of the cluster.
Additional Notes
In order for the e-mail to work properly, we need to have a Mailing Transport Agent (MTA), i.e: postfix, the configuration of postfix is outside this post's scope.
In order to use MPI capabilities, the configuration depends on which implementation of MPI you will be using in your cluster. If you want to keep the default it should work, however performance wise you could be losing by not choosing the right MPI API.
There are three fundamentally different modes of operation used by different MPI implementations [MPISLU]:
- Slurm directly launches the tasks and performs initialization of communications through the PMI2 or PMIx APIs. (Supported by most modern MPI implementations)
- Slurm creates a resource allocation for the job and then mpirun launches tasks using Slurm's infrastructure (older versions of OpenMPI).
- Slurm creates a resource allocation for the job and then mpirun launches tasks using some mechanism other than Slurm, such as SSH or RSH. These tasks initiated outside of Slurm's monitoring or control.
Links to instructions for using several varieties of MPI/PMI with Slurm are provided in the slurm documentation.
Use of an MPI implementation without the appropriate Slurm plugin may result in application failure. If multiple MPI implementations are used on a system then some users may be required to explicitly specify a suitable Slurm MPI plugin. [MPISLU]
References
| [CCE2003] | Simple Linux Utility for Resource Management, M. Jette and M. Grondona, Proceedings of ClusterWorld Conference and Expo, San Jose, California, June 2003 [PDF] |
| [MUN2018] | Munge Installation Guide [link] |
| [BMISC17] | Slurm Overview, Brian Christiansen, Marshall Garey, Isaac Hartung (SchedMD) [PDF] |
| [MPISLU] | (1, 2) Slurm MPI Guide [link] |
| [SLUCGRP] | (1, 2, 3) Slurm cgroup guide [link] |
| [KRNCGRP] | Kernel cgroup Documentation, Paul Menage, Paul Jackson and Christoph Lameter [link] |
Tags: linux slurm mysql mariadb munge python scheduler hpc cluster
Related Content
- Using Python Virtual Environments with Slurm
- UEFI via software RAID with mdadm in Ubuntu 16.04
- Cookies Policy
- About
- Contact me


